The World´s First
Event Efficiency Platform
Sweap enables event teams to create, host and analyse professionally designed in-person, virtual and hybrid events while engaging with your audience before, during and after you event.

Create Your Assets
Sweap gives you all the tools you need to create your event in under 10 minutes.
Event Creation
Create an on-brand, captivating & engaging guest flows in under 10 minutes.
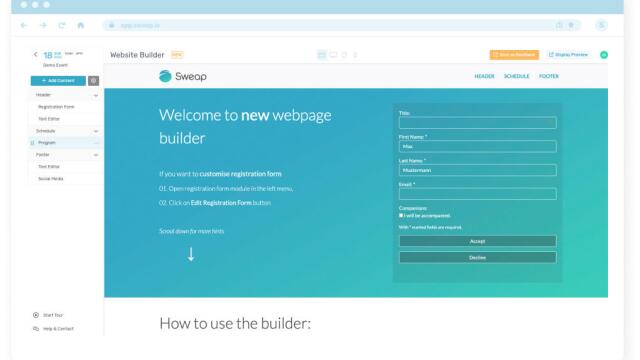
Event Websites
Effortlessly create high converting event websites in a matter of minutes in your design and CI.
Website Builder
Dynamic website builder to craft modern and powerful event resources that leave a lasting impression.
Dynamic Guest Lists
Consolidate all guest information conveniently in one location, Accessible anytime, anywhere.
Lead Forms
Gather essential attendee data points to streamline event registration and data capture.
Event Overview
Centralize event listings and seamlessly integrate them into your website for enhanced accessibility.

Engage Your Audience
Personalisation and automation ensure an impactful attendee journey.
Personalized Emails
Leverage AI-powered assistance to compose highly effective, personalized emails that drive conversions & ROI.
Automated E-Mail Campaigns
Create and automate targeted, individualized, and captivating email campaigns.
Email Templates
Easily create and customize your emails using attractive templates for every stage of your event planning.
Event Ticketing
Boost revenue and amplify ROI through event ticketing. Unlimited ticket types and the most common payment methods.
Guest Data
Collect guest insights across various event formats, providing valuable data for informed decisions.
Content On-Demand
Elevate post-event engagement, extend your event's reach, and foster enduring connections with attendees.
Perform Your Event
Your event management platform for in-person, virtual, and hybrid experiences.
On-site Check-in
Bid farewell to lengthy queues, ensuring your guests enjoy a seamless check-in process without delays.
iOS Application
Effortlessly manage guest entries using the Sweap mobile app, enhancing your event's operational efficiency.
Badge Print
Instantly print badges on-site with our real-time badge printing feature, for attendee identification.
Hardware Rental
Easy on-site experiences with cutting-edge event technology that leaves a lasting imprint.
Virtual Event Platform
No more boring webinars. Transform virtual events into value-packed experiences.
Attendance Status
Maintain constant awareness of event attendance. Always stay in the know on who is there and who is not (yet).

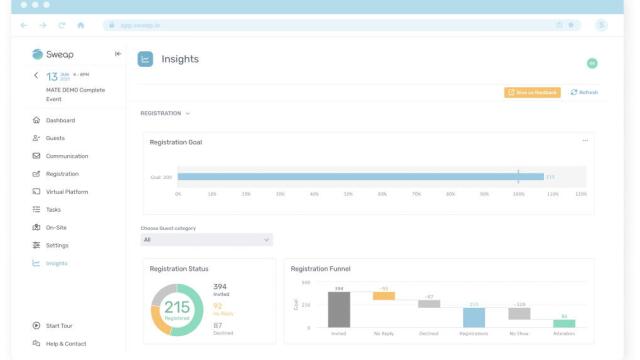
Analyse Your Data
Measure the impact of your event using advanced event insights.
Event Insights
Harness real-time, ready to use event data to measure the impact and success of your events.
Reporting
Compile comprehensive event success reports, providing valuable insights into your planning achievements.
Benchmark
Drive consistent performance enhancements to elevate the overall success of your events.
Email Performance
Examine and evaluate the impact of each email by analyzing its live performance metrics.
Registration Impact
Discern the most influential touchpoints, gaining valuable insights into attendee interactions.
Conversions
Understand who is attending and who needs a reminder or a follow-up in order to increase registrations.

TOP NEWS FROM OUR PRODUCT